Created by Matthew Schmitz BS Sept 2026 with edits by Adam Vaske BS and Sami Corman BS
Principles
- Purpose: This article is designed to help medical students contribute to and learn in the operating room and clinic.
- Medical Student Conduct: Competence and humility will open doors and make friends. Avoid arrogance at all costs. Work hard, offer your seat, defer credit, and say thank you.
- Variation in Medicine: Certain things are commonly done in a similar fashion (e.g. maintaining a sterile field). However, variation is common (e.g. procedural steps, post-op orders). You will often identify your preferred way to do things that you'll discover after being exposed to several options (e.g. Duck-bill mask with blue tape is a great face covering in the OR).
- Clinical Settings: Three common settings you will be exposed to: hospital, clinic, and the emergency department. They can be contained within the same building but are often separate. The clinic is where patients are evaluated for treatment which may include surgical or medical management.
- Hospital Layout: There are generally three hospital locations you will navigate
- Floors/Wards/Units are often used as synonyms and are where patients are hospitalized ("inpatients"). There are 4 primary pathways to being admitted to the hospital: 1) Post-op from surgery 2) Admitted from the ED 3) Direct admit from clinic 4) Transfer from another hospital.
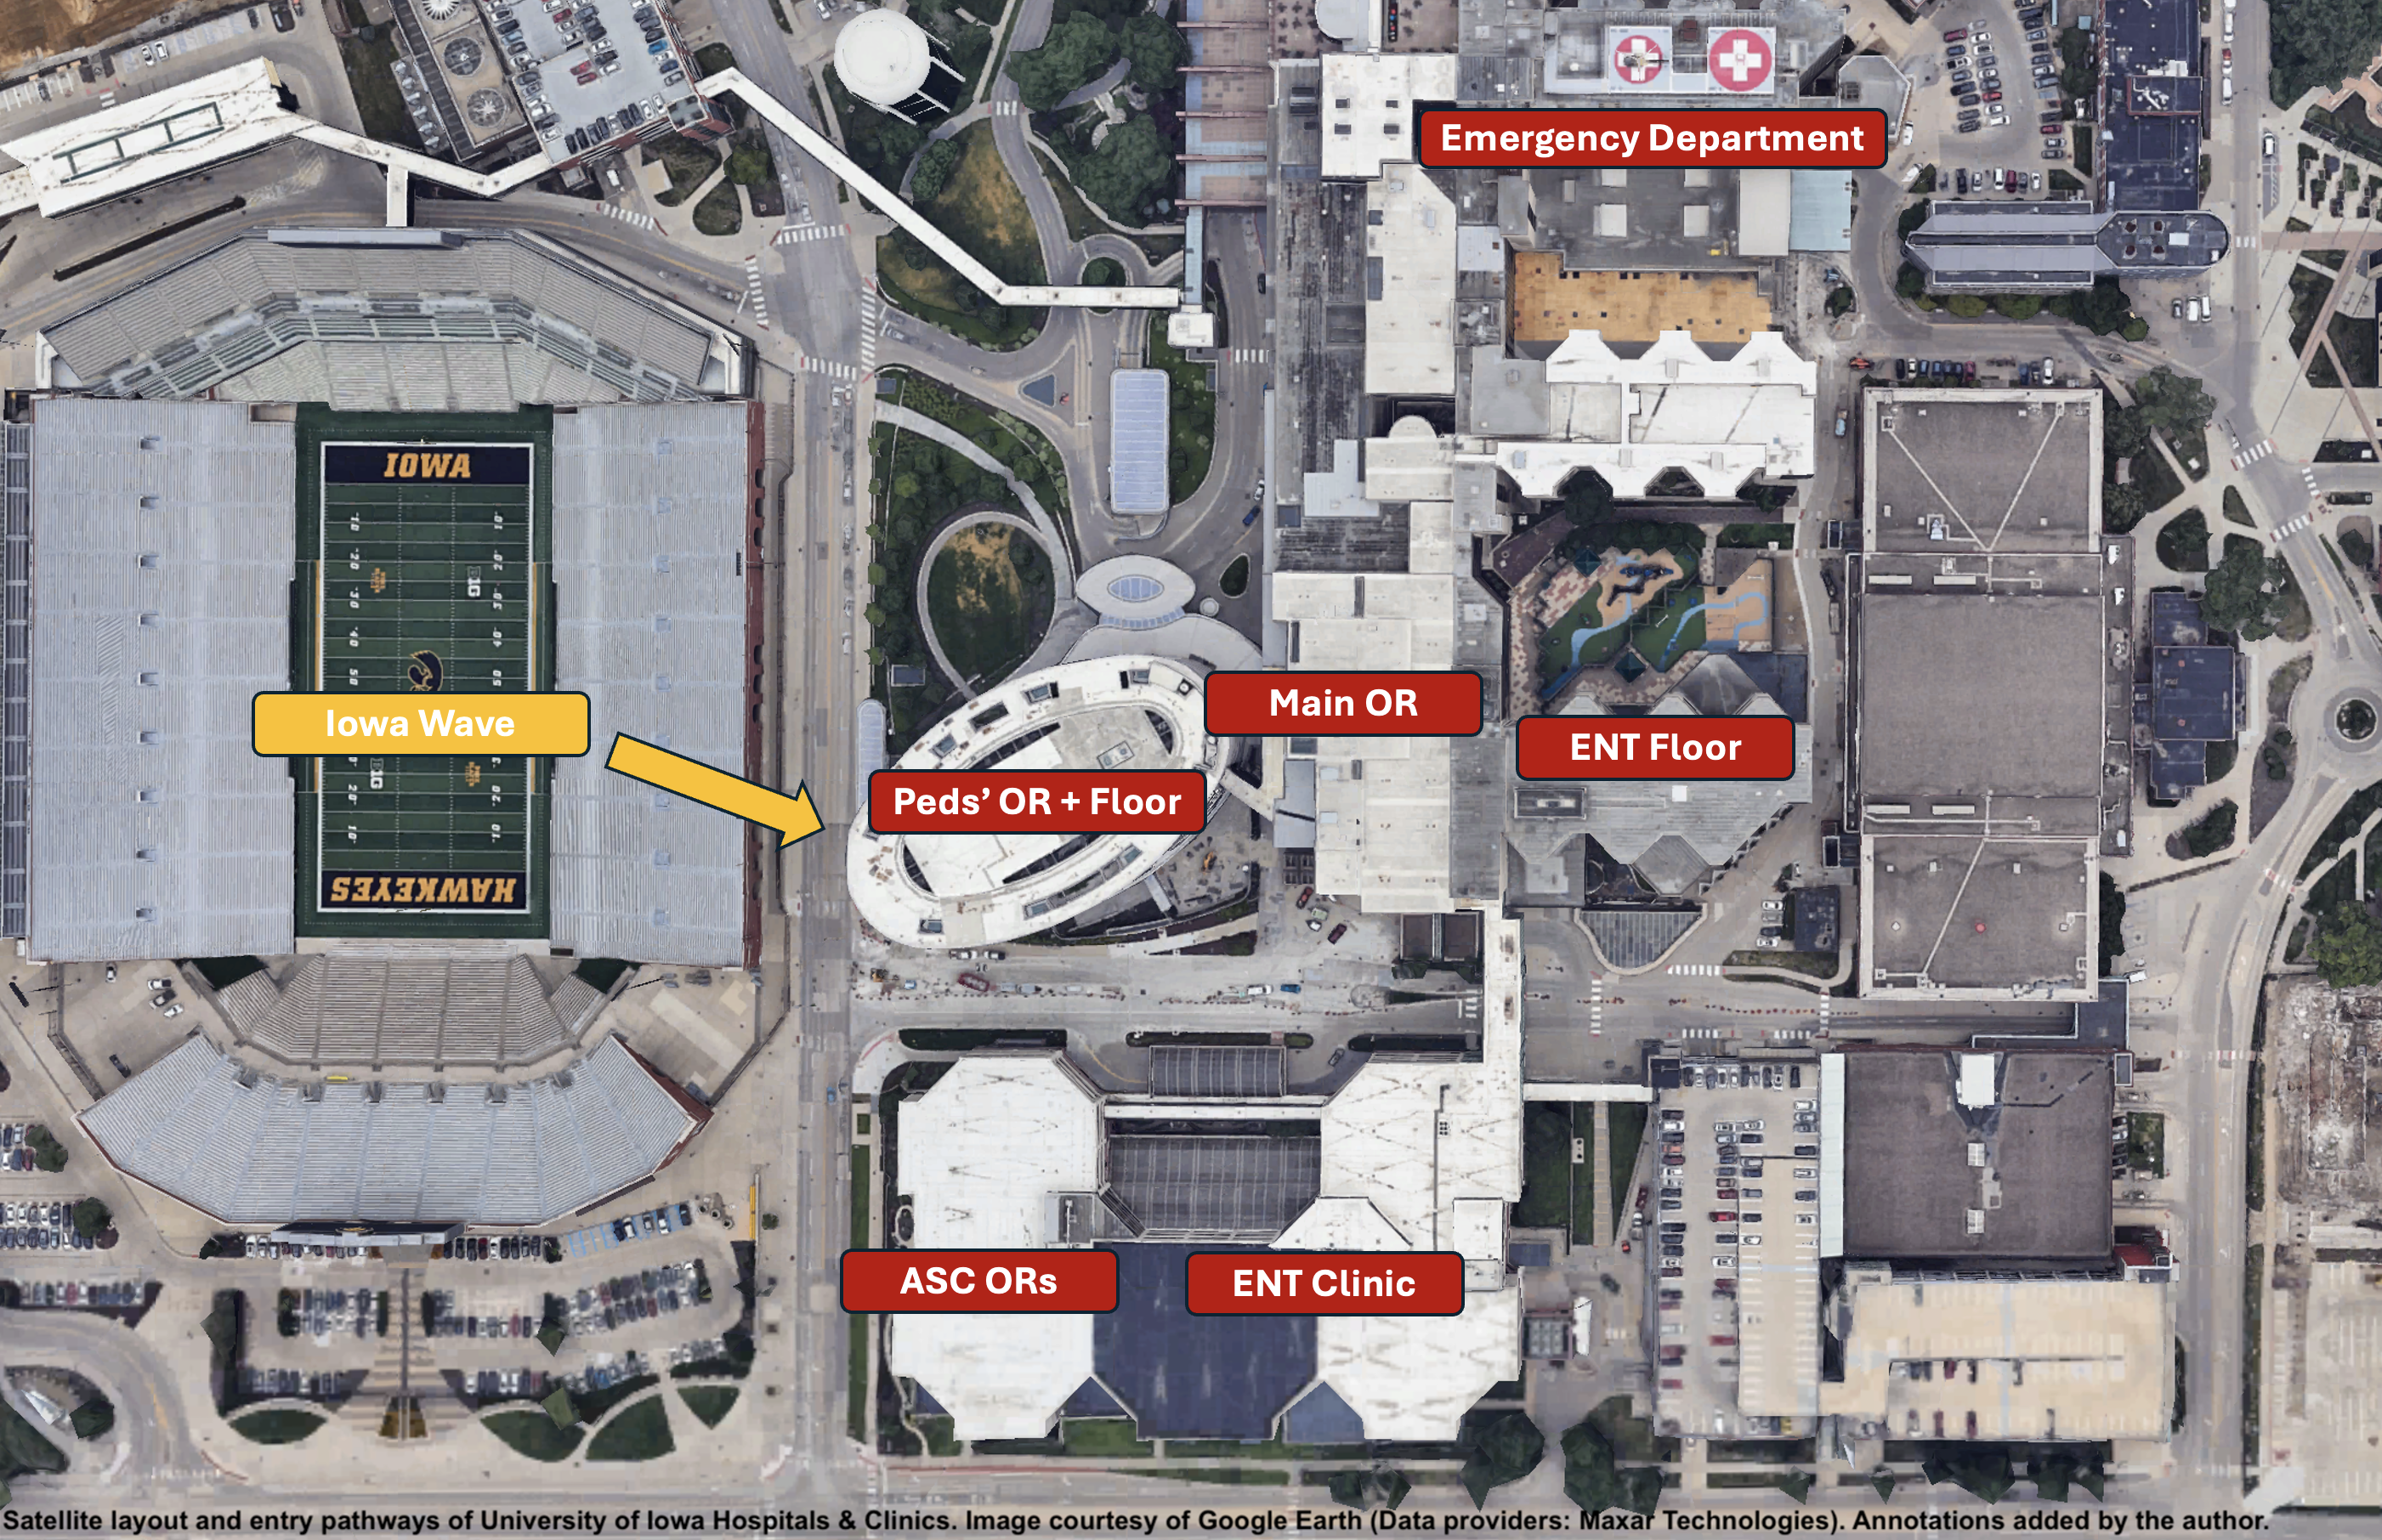
- Operating Rooms: Certain surgeries may be scheduled at different locations with some general guidelines that are not inviolate: Children in the pediatric ORs, patients with comorbidities or from the emergency department in the Main ORs, and otherwise healthy patients at ASCs.
- The Emergency Department is where you will have an EM rotation or see consults in your specialty (e.g. epistaxis, peritonsillar abscess, acute airway obstruction consult in the ED).
- Three other locations that are essential to patient care include radiology suites (X-ray, CTs, MRI), laboratories (blood work, frozen sections from surgery), and pharmacies (medications for inpatients and those getting discharged).
- Below is an aerial view of the University of Iowa Hospital and Clinics with departments relevant to Otolaryngology labeled in red.
Day in the Operating Room
Suggestions to help prepare the night before
- Review PREP (including study of relevant sections of the Iowa Protocols):
- Procedure & Indication (neck exploration vs focused left inferior parathyroidectomy for primary hyperparathyroidism).
- Relevant History (CKD affecting medication administration, prior neck surgeries).
- Exam & Imaging (ultrasound/sestamibi/4D CT for location and size).
- Pathology & Labs (PTH, serum and urine Calcium). Take notes in a small booklet that you can carry with you into the OR.
- Know the Anatomy: Start by studying regional nerves and arteries then move on to other soft tissue or skeletal structures. These structures form important landmarks for the procedure and anatomy to avoid.
The Day of
- Arrival: Arrive to the hospital ~1 hour prior to when the case is scheduled and change into surgical scrubs. Hospitals are often difficult to navigate, as construction and prior additions may make for convoluted routes. Asking staff for directions is often helpful.
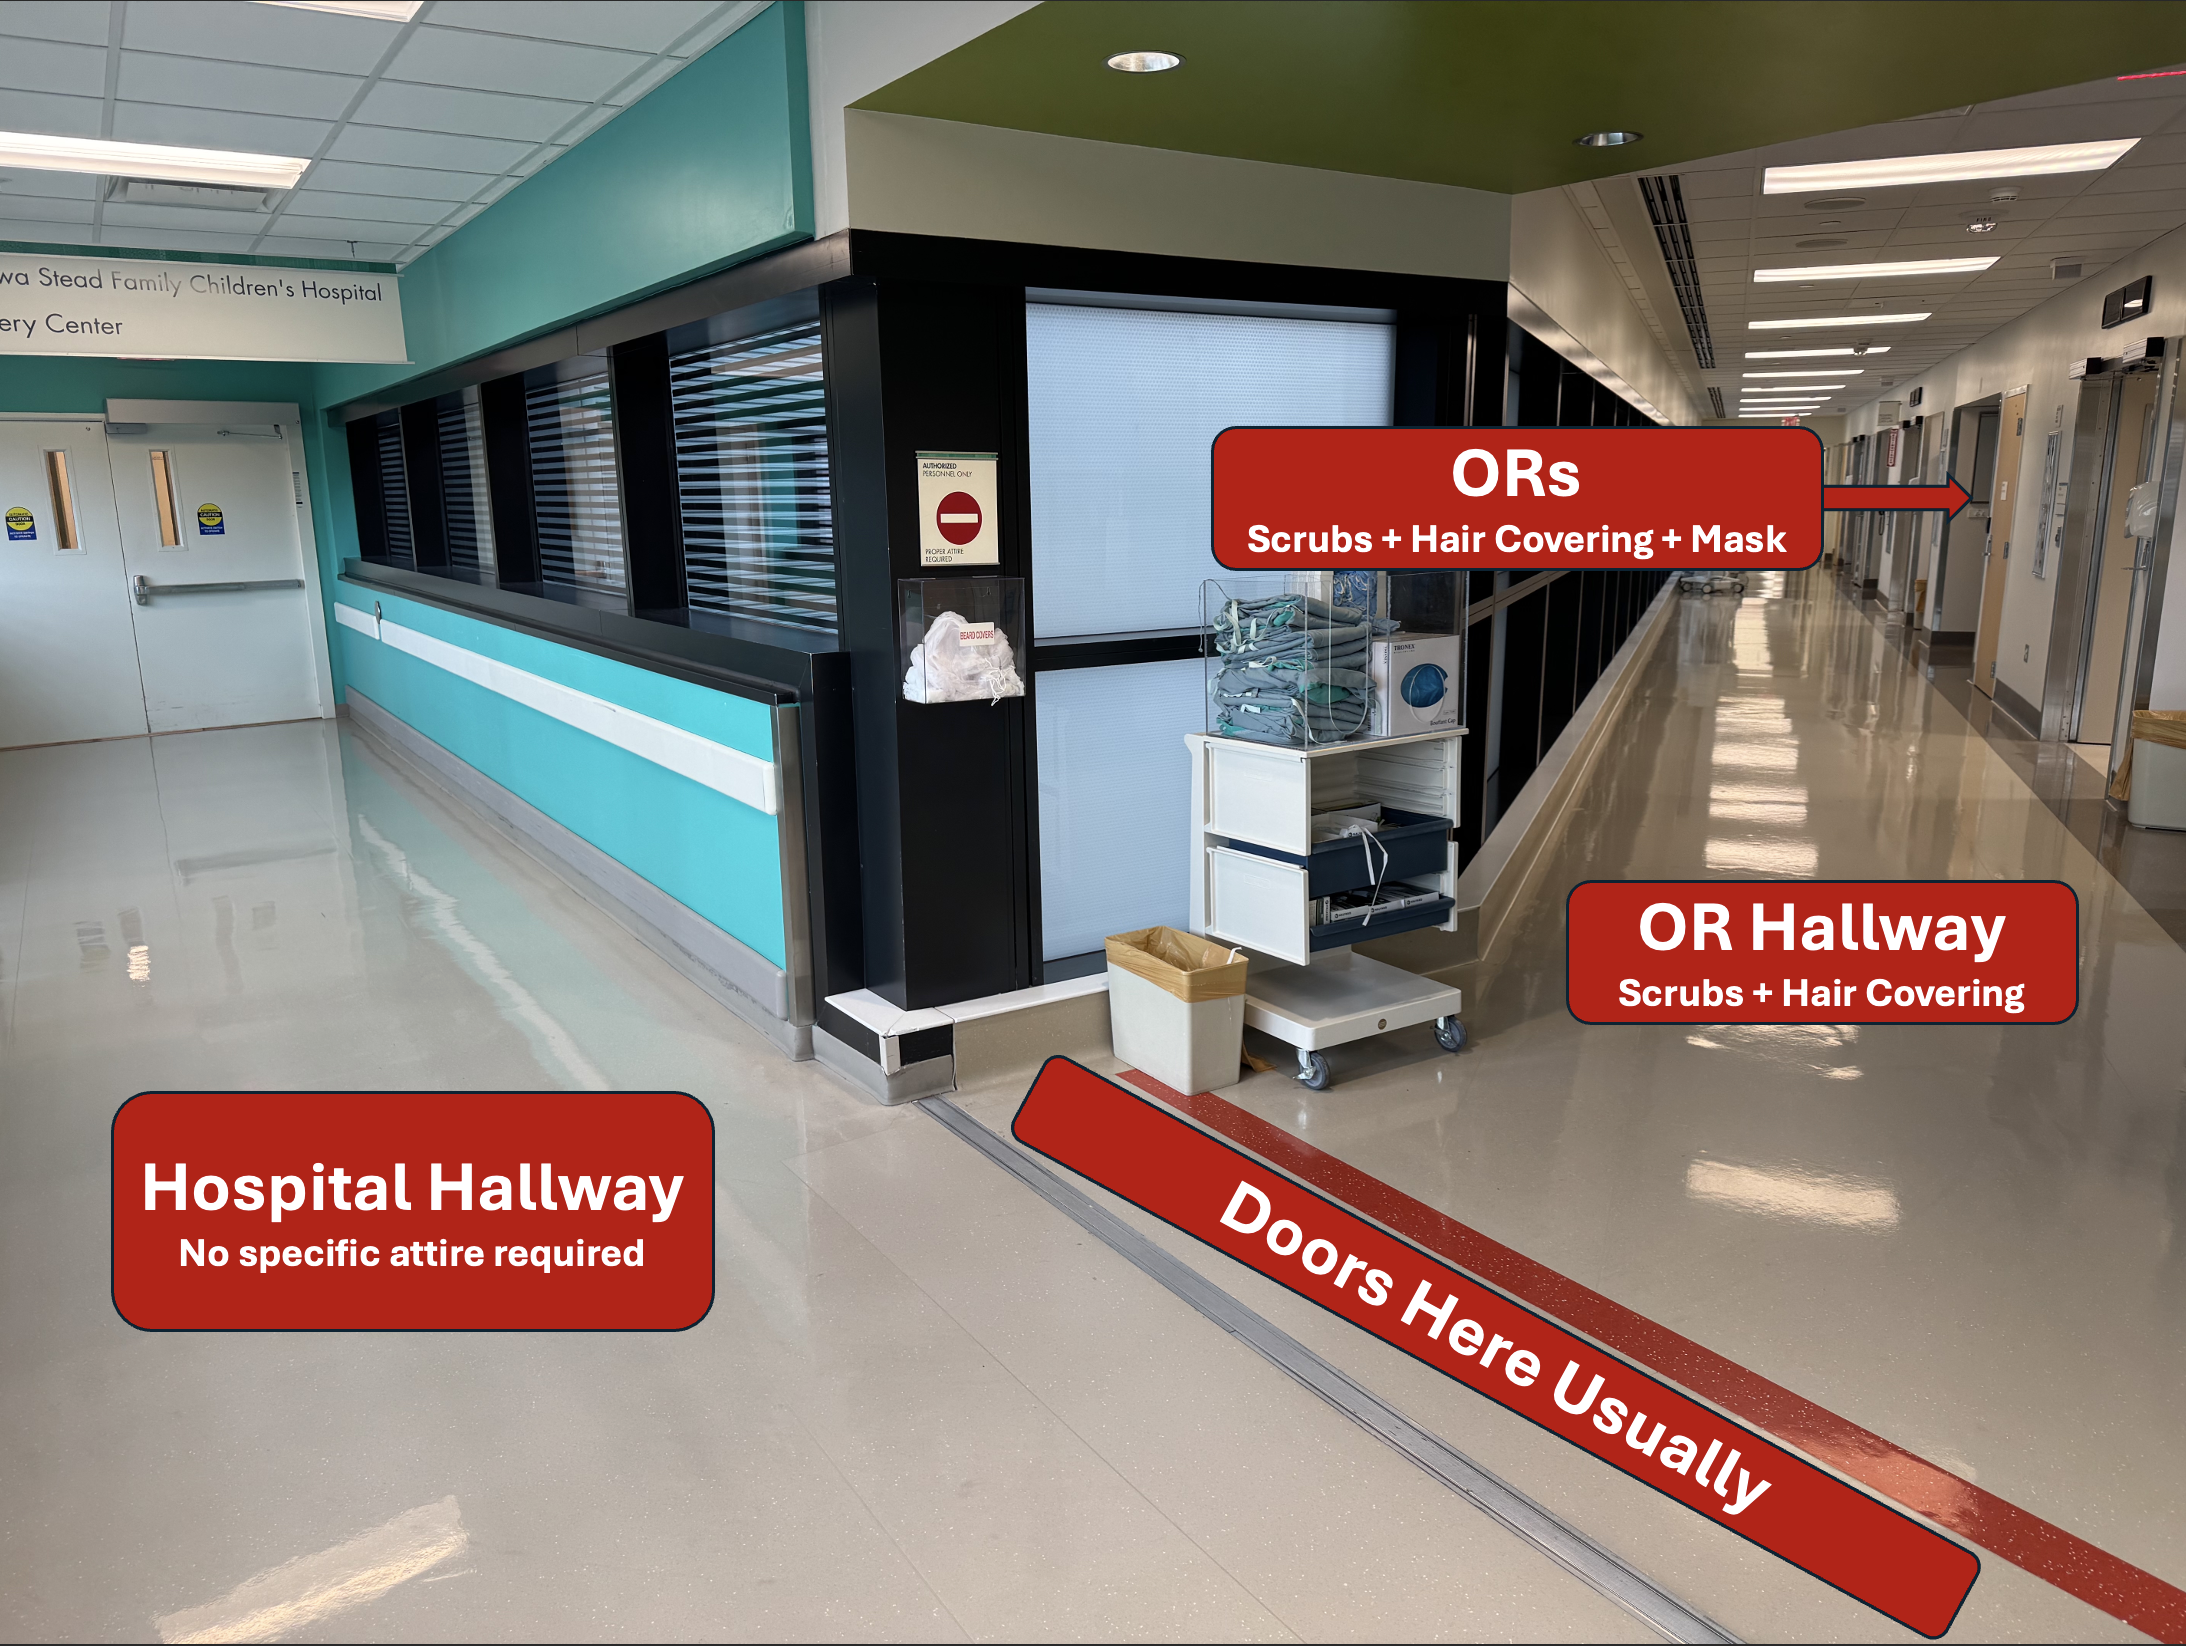
- Attire for the OR: Be aware of attire: You must wear surgical scrubs in the OR, not your own. There are three zones:
- The hospital floors and hallways that do not require scrubs.
- Badge-access through doors to OR hallways which require surgical scrubs and hair protection.
- The operating rooms which require surgical scrubs, hair protection, and a mask.
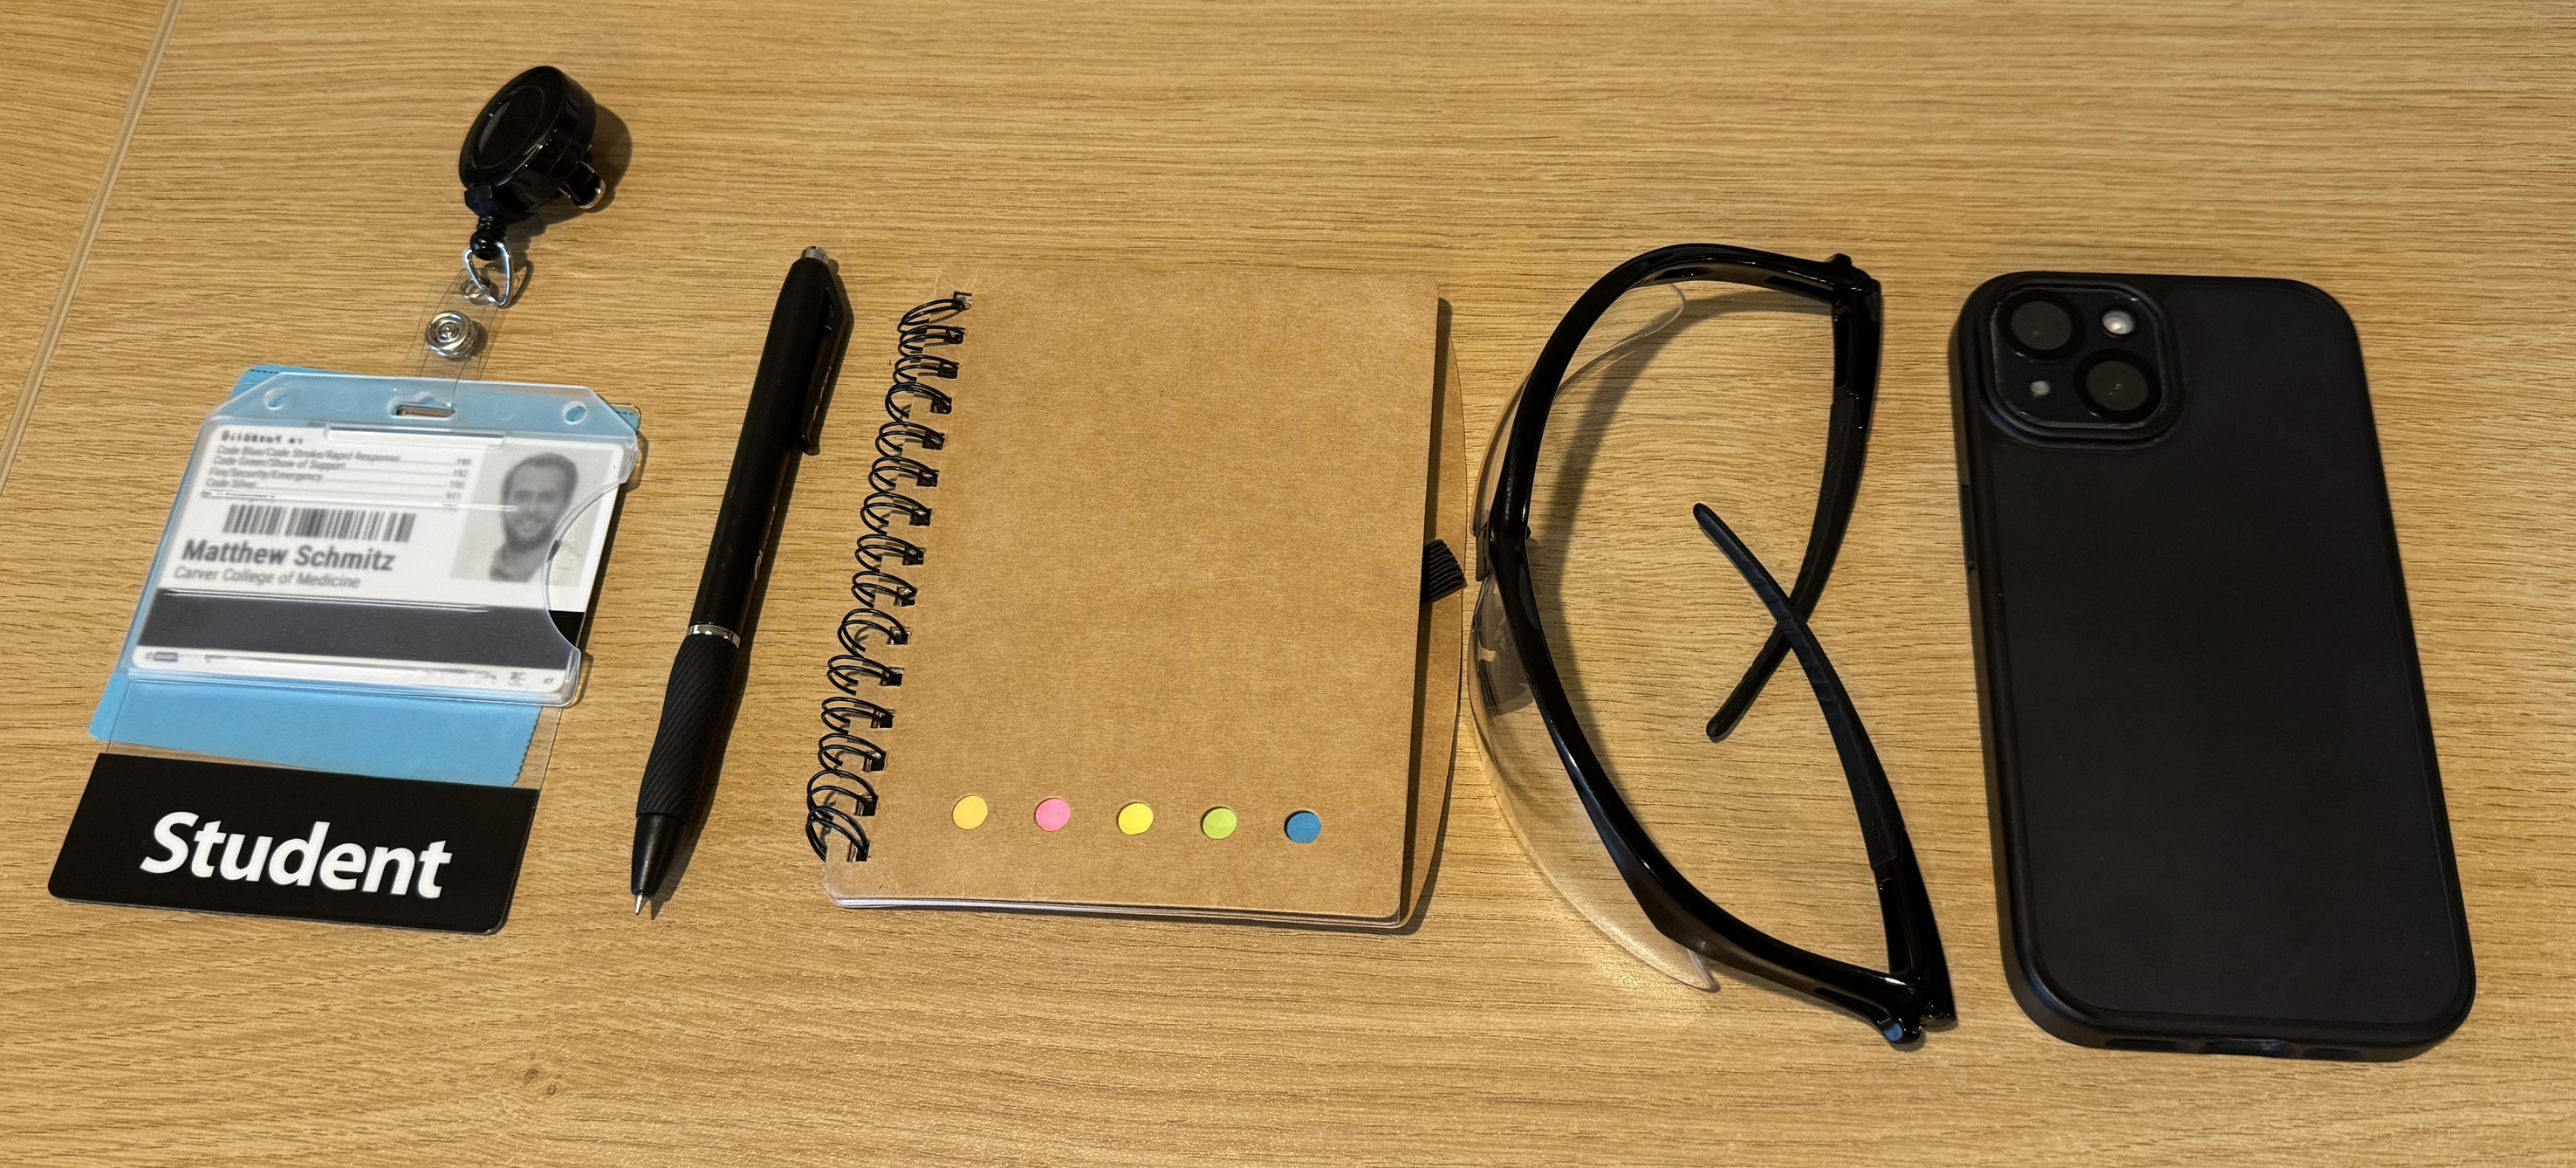
- Personal Items: Things to carry with you from the locker room for an OR day:
- ID Badge
- Pen
- Small notepad with your notes from PREP (or can keep notes on plain paper)
- Eye protection (ORs often have disposable ones)
- Phone
- Locating the OR: Ideally you have the OR number written down from chart review. If not, there is a command center in the OR hallways that will have the cases displayed on screens with their room number and status.
- Morning Scrub: You can do a morning scrub once you've found the correct OR (look up videos on how to scrub properly).
- Patient Trajectory:
- Patients arriving from their homes, their hospital rooms, or the emergency department start by going to pre-op (ED patients may go straight to the OR).
- In pre-op, the surgeon meets with the patient, marks the surgical site, and gives the "go ahead." The anesthesiologist also meets with the patient.
- The OR must be ready (trays open and sterile field set up) and the surgeon team & anesthesia team must meet with the patient before they are taken back to the OR.
- Entering the OR:
- Get to the OR before the patient and introduce yourself to the OR staff (have your mask up when entering the room).
- The team may seem busy or reserved at first but introduce yourself at an opportune time and they will warm up to you as you demonstrate awareness and desire to be helpful.
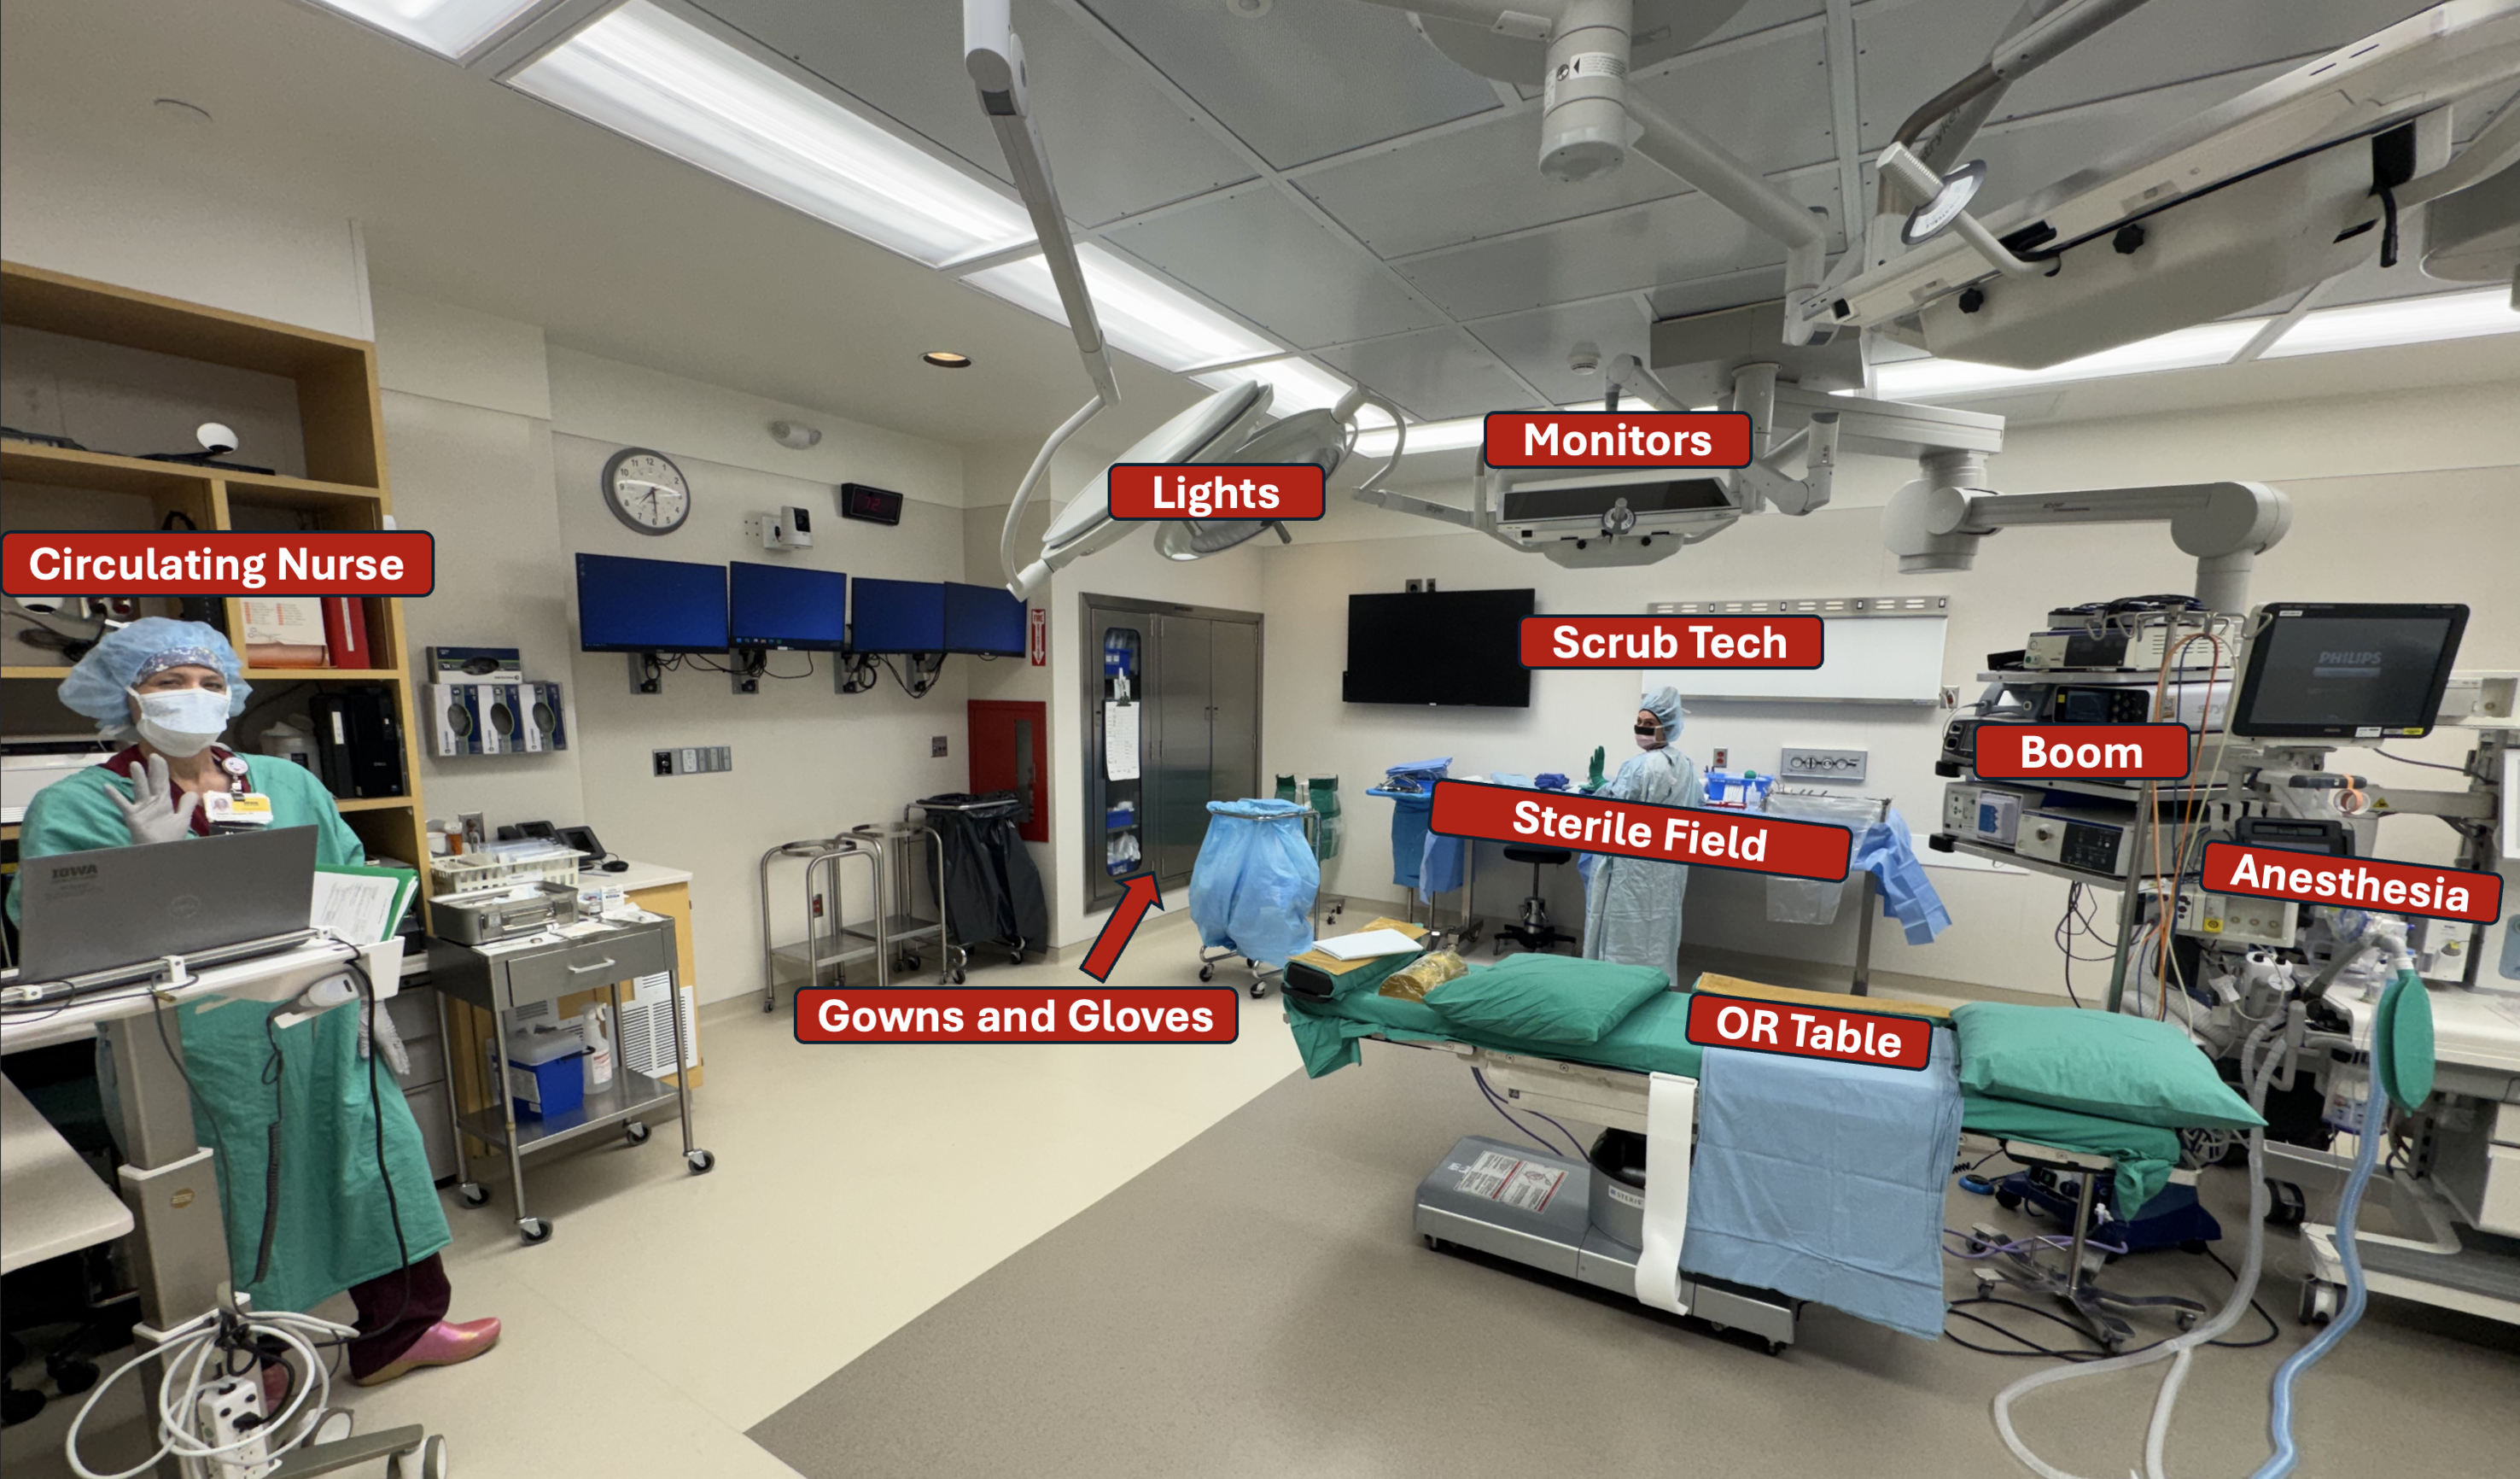
- Key OR Elements:
- Circulating Nurse: Performs non-sterile tasks in the OR, including charting the case in the EMR and opening sterile supplies for the scrub tech. Ask the circulator where to write your name for logging personnel in the room (e.g., Matthew Schmitz, M4).
- Scrub Tech: Sets up the sterile field and is responsible for instrumentation during surgery.
- Sterile Field: Do not touch the sterile field unless you are scrubbed in. Once scrubbed in, do not touch anything except the sterile field (a common mistake is leaning against the bed prior to draping).
- Anesthesia: Performs induction and airway management when the patient arrives. Keeps the patient sedated and stable throughout the procedure. Be mindful while the patient is still awake. "Read the room" to potentially remain quiet or assist in conversation with the patient prior to pre-oxygenation.
- Boom: Contains the necessary nonsterile electronics (cautery and grounding pad, camera input).
- Patient Arrival: Once the patient arrives, here are important ways to be helpful.
- Put on non-sterile gloves and assist with patient transfer. In general, help where needed but try not to get in the way. It takes time to discern when and how to assist.
- Take the OR bed out to the hallway after the patient has moved onto the OR bed.
- Assist in placing SCDs on the patient's legs after ensuring the patient is informed of their purpose (if the nurse is working on one, you may be able to do the other).
- You can watch quietly while they put the patient to sleep.
- Patient Positioning: Removing arm boards and tucking arms, looping straps around the bed anchors, holding arms, lifting shoulders, and grabbing cushions and pillows are all helpful to position the patient. Learn about the importance of these functions to diminish the risk of acquired nerve injuries or pressure wounds during longer surgeries.
- Keeping things clean: Collecting bits of garbage and throwing them away may be helpful (always best to ask in the process).
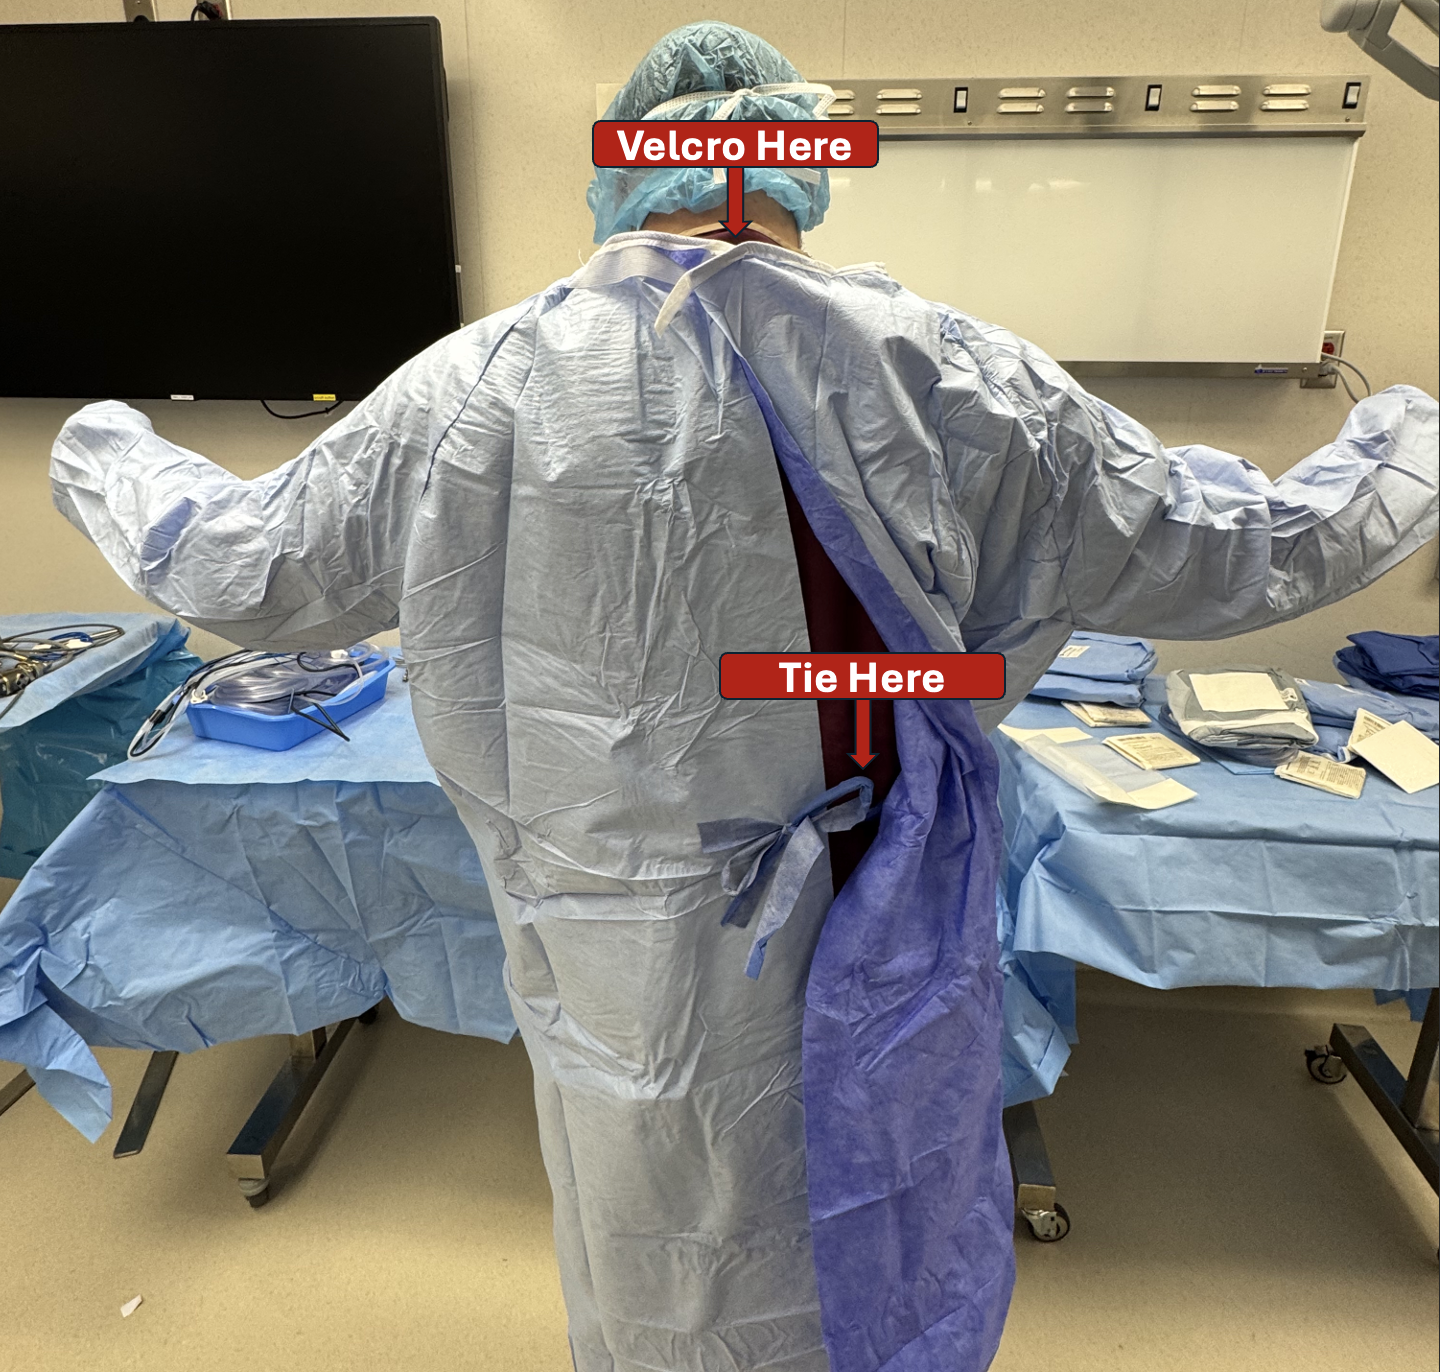
- You can be helpful in tying the scrub tech's/resident's/surgeon's gown, shown below. Start by velcroing the top back of the gown. Then tie the waist-level inner strings of the gown. Do not tie the outer strings, those are sterile.
- Your goal is to achieve the "You're hired" compliment.
- Gowning and gloving
- Timing: There is considerable variation here. Some surgeons expect you to be gowned by the time they arrive, others may have you watch over the drapes if there are residents on the case. Ask the resident or the surgeon at the right time if they want you to scrub; if they do, make sure that your gown and gloves are on the sterile field before you scrub and gown.
- Research videos on how to gown and glove.
- During the Procedure: Now you're scrubbed in and sterile.
- Reading the Room: Look for the opportune time to ask questions and assist and understand when silence is the best practice.
- Setting Up: Observe set-up and gradually start to assist with each iteration once you have become acclimated to the process with the understanding each surgeon has individual preferences (helping with draping, organizing electrical lines, placing light-handle covers).
- Retracting: After incision, hold retractors (Army-navy, Richardson, Senn) in the position given to you. You will be told you drifted, it's ok. Say "my bad" or "sorry about that" and keep doing your best. The objective is exposure for the surgeon.
- Scissors: Soon after the surgeon asks for sutures, you may ask for suture scissors once you have observed the process and identify your involvement is desired. If it is your first time cutting sutures, ask the scrub tech to show you how. In general, subcutaneous sutures are cut right above the knot ("no tail") while cutaneous sutures are cut with a tail ranging from 0.25 cm to >2 cm.
- Lighting: You can help maintain visibility with the overhead lights. Only touch the light handles once they have sterile covers. Ask before helping to position them for optimal lighting on the surgical field. Twist the handles to focus the light properly.
- Over time and varying by institution you will be trusted with more responsibility that may involve assisting in closing incisions, cauterizing, clipping vasculature.
- Post-Procedure: After the surgery is concluded, the surgeon may leave to talk to the family while the resident team cleans up and the patient wakes up. Here are ways to be helpful in the meantime (only after approval from the team).
- Use a wet and dry sponge to clean any iodine or blood off the patient to prevent skin irritation.
- Take the drapes, roll them up, and put them in the garbage. Make sure there are no sponges in the drapes because they need to be counted, ensuring there is nothing retained in the patient. Make sure there are no metal instruments or needles in the drapes.
- You can scrub out at this point.
- Retrieve the OR bed from the hallway and assist in moving the patient over to the bed.
- Help turn over the room by placing soiled linens in the laundry and using chlorhexidine wipes to wipe down the OR.
Day in the Clinic
- Clinic is a good way to show your skills and develop relationships with attendings without a mask disguising you (some staff and residents prefer to wear masks in clinic - especially when performing aerosol-producing procedures such as tracheotomy tube changes and flexible laryngoscopy. If you are just starting clinical rotations, the following instruction may not be expected of you, but it is a good way to learn.
- Clinic Preparation: This varies by institution. Some places expect you to come to clinic prepped for the day. Others place less emphasis on this. If you are working with multiple residents, you will have more time to chart review a patient between appointments. If you are alone with an attending, you will want to chart prep the day/weekend before so you don't miss out or slow the process. An example of instructions given to residents regarding function in the clinic: R1 Otolaryngology Resident Preparation Rotation with Dr. H Hoffman
- Chart Preparation: Use the acronym PRISM to remember key elements.
- Purpose of appointment. Examples:
- 3mo surv: BOT SCC s/p TORS + BND = 3month surveillance for base-of-tongue squamous cell carcinoma status post trans-oral robotic surgery with bilateral neck dissections.
- New pt: primary hyperparathyroidism.
- Relevant History: Look at patient's active problems and record comorbidities that would affect surgery (HTN, Heart failure, COPD) and comorbidities that may be related to chief complaint (constipation, kidney stones, polydipsia, brain fog, prior fractures for suspected primary hyperparathyroidism).
- Inspection: Prior exam findings.
- Studies: Blood work or imaging already performed.
- Management: You can often have a plan in place for what will be done next.
- It can be difficult to find the reason for referral in the chart. Selecting "referrals" or "consults" may help determine the reason for their visit. To narrow down previous notes, you may consider creating a specialty filter (Shown below). Using the search bar and typing in key words (Oto or ENT) may help as well.
- Purpose of appointment. Examples:

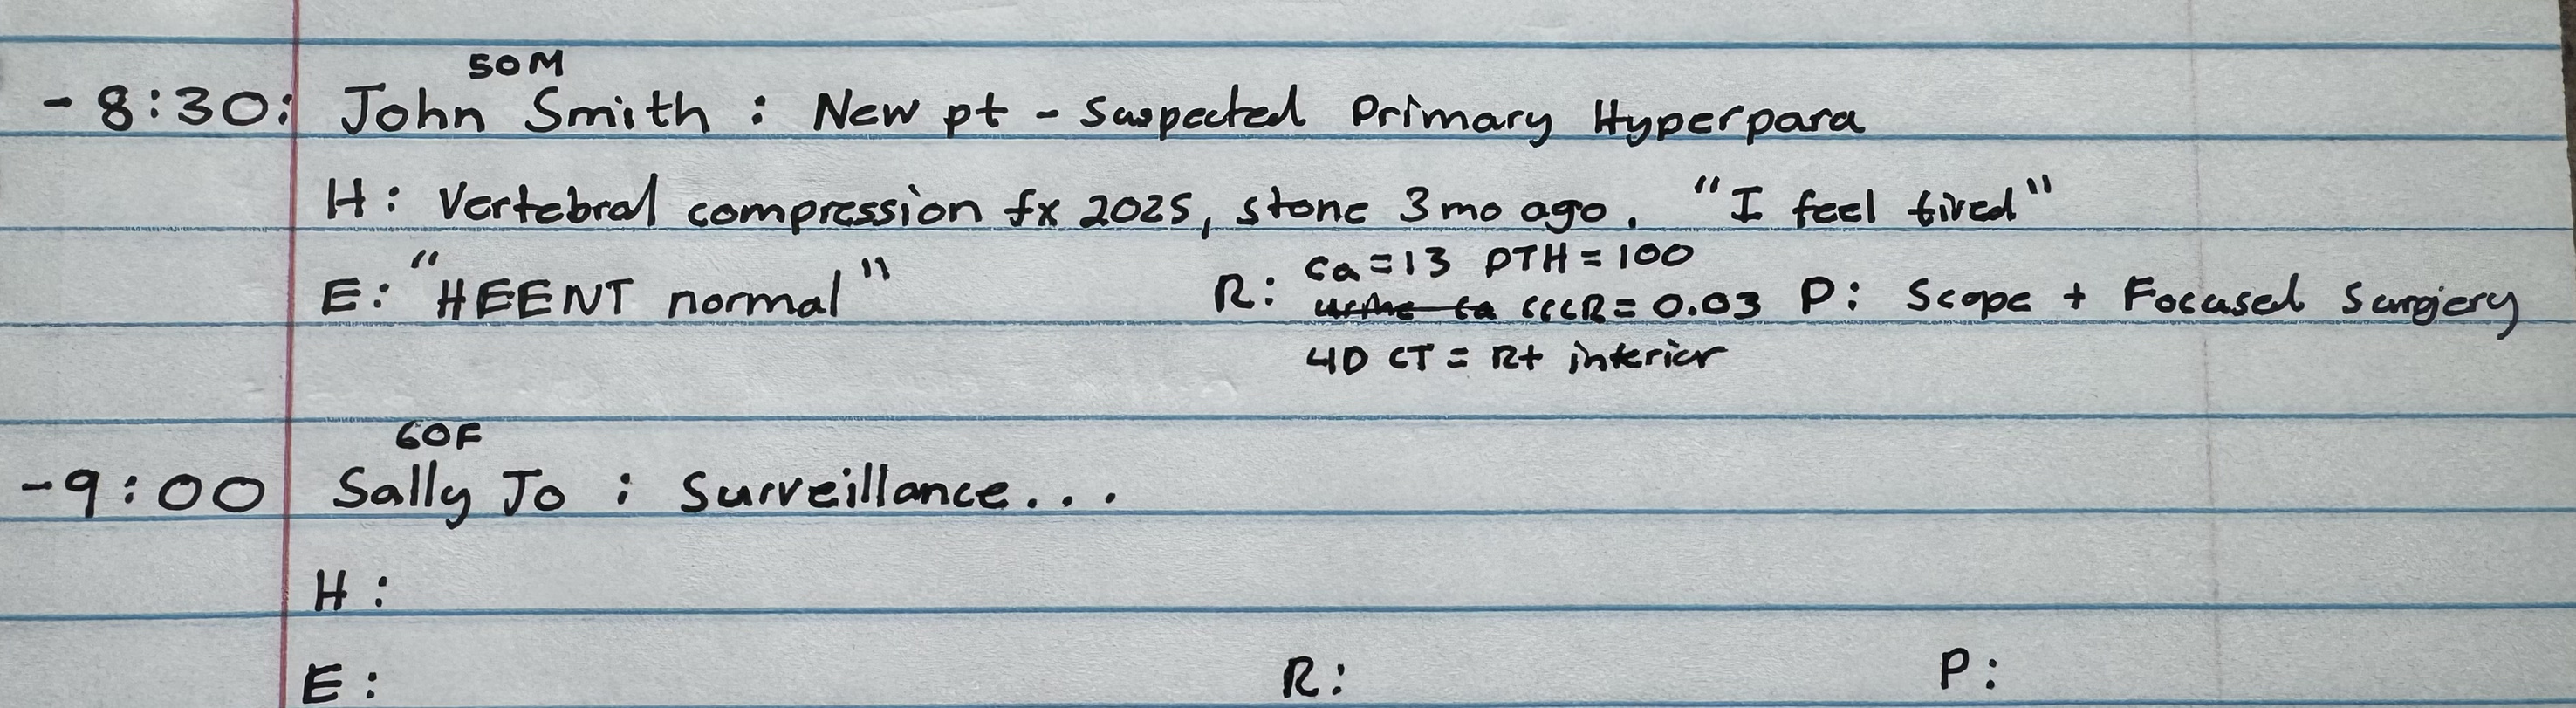
- Attached below is a way to chart prep in a time-efficient manner on paper. H = History. E = Exam. R = Results. P = Plan.
- Using the EMR/EHR: The Electronic Medical or Health Record
- Epic is a commonly used EMR. Below are a few tips for using it.
- Your involvement with the medical record will vary by institution and also by attending doctor within a given institution. If you are to be involved in the record keeping (such as creating a med student note) the following suggestions may be helpful:
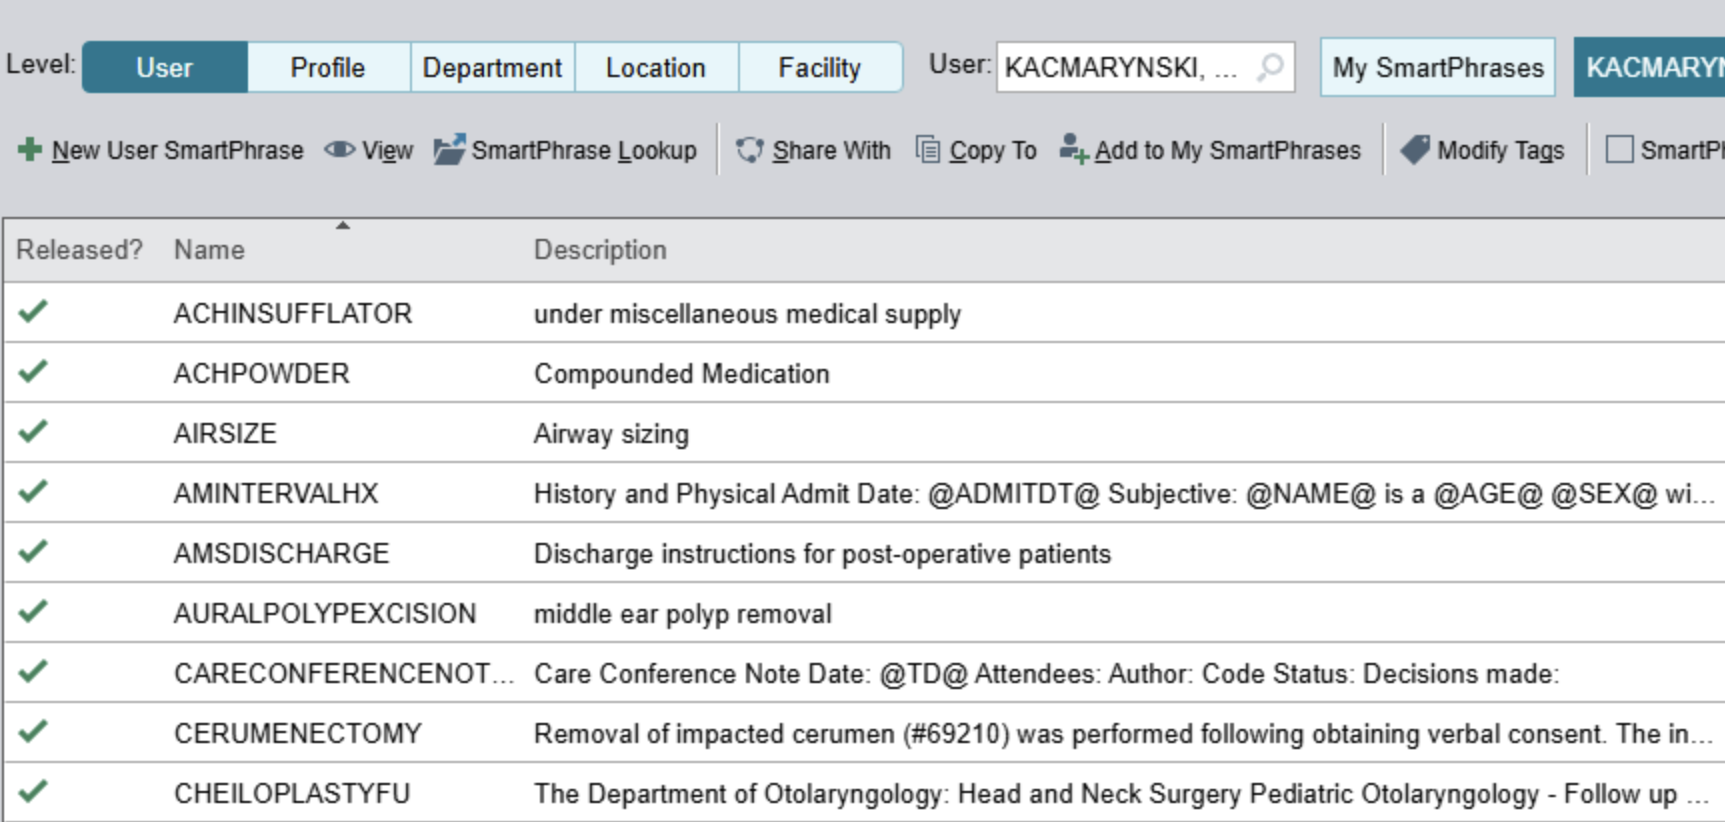
- The morning of: Copy the attending's most important smart phrases shown below. Go to your "My SmartPhrases." You may have to go to SnapBoard and pin it to your toolbar.

- Search for your attending's smart phrases and add them to your own library.
- You are now ready to start clinic!
During Clinic
- Objectives During Clinic
- Do not slow down the day.
- Gather the relevant history and present in a concise manner that paints a clear picture.
- Demonstrate your knowledge by formulating a plan.
- Tips
- Presenting
- Improves over years of repetition.
- Do your best to eliminate filler and narration ("I think" or "which seems to be").
- In general, concise is better. If you lose the surgeon's attention, then they will miss the rest of your presentation. It is better for them to ask questions about additional information than to include too much detail and lose their attention.
- EMR
- Every EMR is different. Versions of Epic may be different as well, so you will have to adjust if you rotate at different institutions.
- If it is possible to have the EMR on your laptop and take it into the room - may or may not be helpful.
- If the patient is a new patient, use the surgeon's new note smart phrase if they have one, or use a generic one from another surgeon.
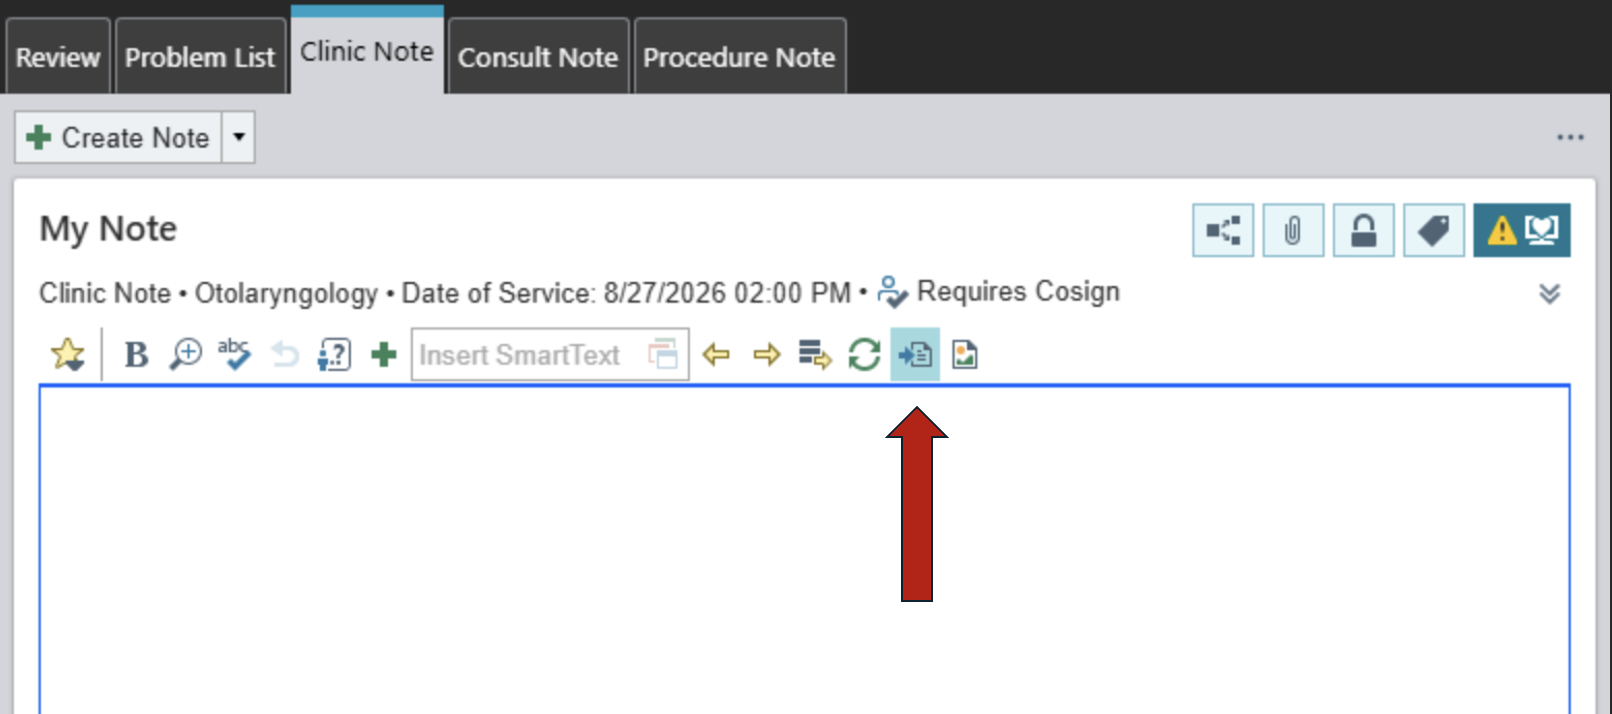
- If the patient is a follow-up, you may consider copy forward the previous note shown below.
- Presenting
Best of luck in the clinical setting!
All images except the aerial satellite image are author owned. All personnel included in the images above provided verbal consent to have their photograph taken for publication in the Iowa Head and Neck Protocols.