Return to: Otology Neurotology Protocols
Room Set-up
- Patient images
- Stenver view mastoid to assess bone thickness overlying superior canal; MRI coronal and axial (post-contrast) showing tumor and confirming operative side.
- Patient clinic notes placed on OR wall
- Pre-operative note
- Audiogram
- ABR test results
- Internal medicine surgical co-management note
- White board
- Intra-operative medications
- Nursing instructions to call family every 3 hours
- ABR settings
- Patient positioning with 3 point straps to allow rolling of the bed to improve operative exposure
- Electrode placement; NIMS monitor electrodes in the orbicularis occuli and orbicularis oris with ground electrods on the chest; ABR click generator in the operertive side ear canal; 3 ABR electrodes (one on each mastoid and one on vertex). Also note the posteriorly based temporal skin flap design.
Operative Procedure
- Prep
- Orders:
- Ancef, decadron - induction
- Mannitol - incision
- NIMs electrodes orbicularis oris and oculi - "Iowa Ear" setting on the console (0.05mA threshold)
- Hang notes, audio, consent
- Images up
- MRI - T1 post and CISS sequences
- Stenver's view (Gantz)
- scope should be set up for observer/assistant on same side as tumor (opposite other ear rooms - primary surgeon sits at head of patient)
- find anesthetist to discuss:
- decadron (induction) & mannitol (incision)
- hypervent to ET of 28 until closing
- BP cuff & ETT contralateral to tumor
- no paralysis
- turn before A-line
- EAP monitor (Megan) - page 15m before needed (when start dissecting tumor).
- place skin electrodes & in-ear phones; 4 - one on each mastoid tip, trichion, vertex
- test ABR
- straps x3 - thumbs up
- do test roll
- Hansen likes foam rather than blankets for tucking
- Shave head - generous shave - (Hansen) ask if wanna keep side burn? up to widow’s peak
- Foley
- Incision and Elevation of Skin Flaps
- Gantz - Reverse question mark from tragus > up > 4-5 cm above helical root > curve to forehead; extend inferior leg posterior to tragus
- Hansen - same as above; extend inferior leg of incision anterior to auricle for few millimeters in some cases (to facilitate exposure of zygomatic root)
- Incise with 15 blade to level of TP fascia
- Elevate skin flap in plane of TP fascia. It is useful to wrap skin flap in moist raytech to prevent from dessication during case. Use tie-back suture to keep retracted out of your field
- Frontal branch - watch out for it
- In TP fascia proximally
- Deep to temporal fascia along zygomatic arch
- Fascia harvest
- Harvest small ~6x5cm piece of temporalis fascia to use in closure - leave 1cm rim of fascia along muscle edges to suture to later with closure (see image below, fascia already harvested)
- Incise the fascia sharply and dissect free of underlying muscle with scissors
- Muscle flap elevation
- Elevate the temporalis off of the calviarium using periosteal elevator. Again, wrap the muscle in moist raytech to protect from dessication, retract off field with stay suture.
- Creation of temporal craniotomy/bone flap
- Approximately 4x5cm bone flap centered over zygoma. Zygoma estimates level of floor of middle fossa
- Drill cortex with 5 cutter, bone wax as necessary for bleeding
- Bone will be thinner anteroinferiorly, thicker posteriorly
- Once dura is seen below a thin layer of bone, switch to a diamond burr so as not to injure dura
- Next, remove the bone flap and set aside for later
- Freshen the edges of the craniotomy with the diamond burr. Ideally, the inner and outer cortical tables should be parallel to keep the House-Urban retractor from shifting/rocking
- May need to ronguer excess bone, especially inferiorly, to achieve adequate access to the middle fossa floor
- Retract temporal lobe and place House-Urban retractor
- Bipolar cautery can be used judiciously to contract the dura and decrease the need for mechanical retraction
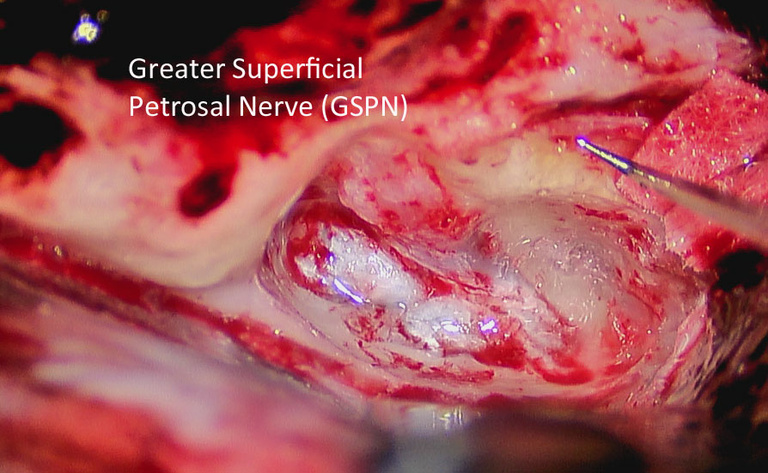
- Carefully dissect the dura off of the middle fossa floor in a posterior to anterior direction (prevents avulsion of the GSPN)
- Dissect dura off the GSPN taking care to leave nerve down while elevating dura up with temporal lobe
- The middle meningeal will come into view and may need to be cauterized to provide adequate exposure (this is anterior limit of exposure)
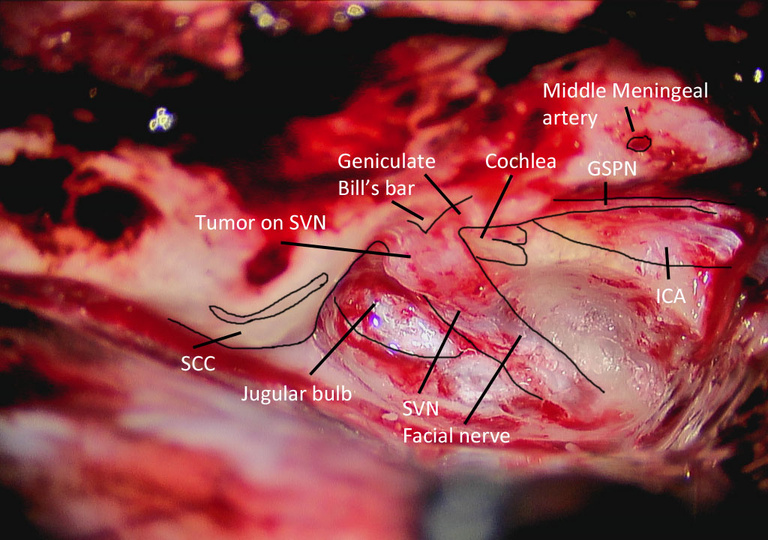
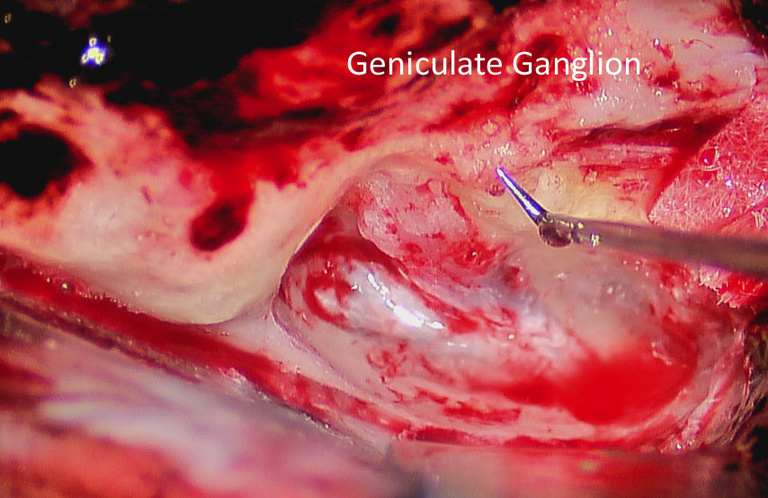
- Identify GSPN and arcuate eminence - IAC will bisect the angle formed by these two landmarks
- Place the blade of House-Urban under the lip of the petrous ridge and engage in the retractor *** (easier said than done)
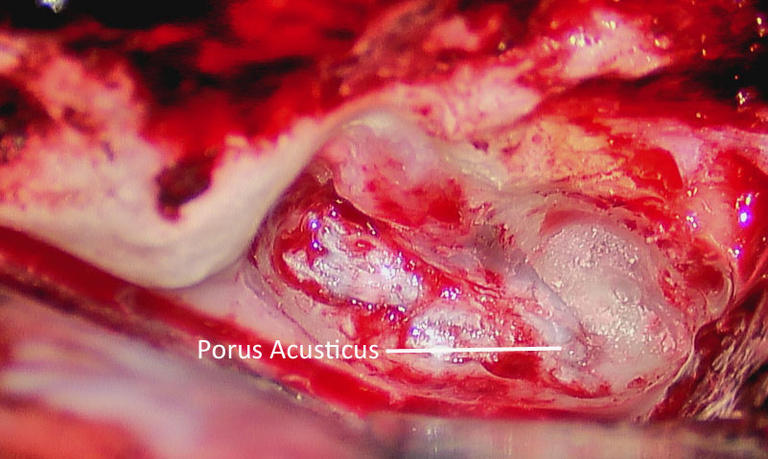
- Expose internal auditory canal
- Drill to expose IAC in 270º
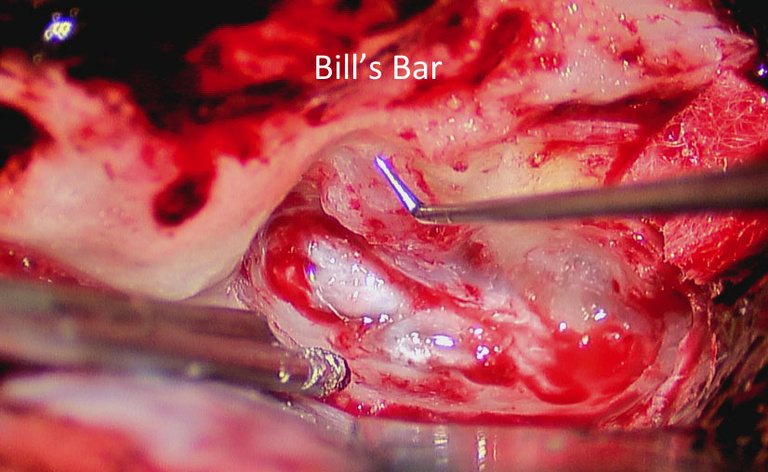
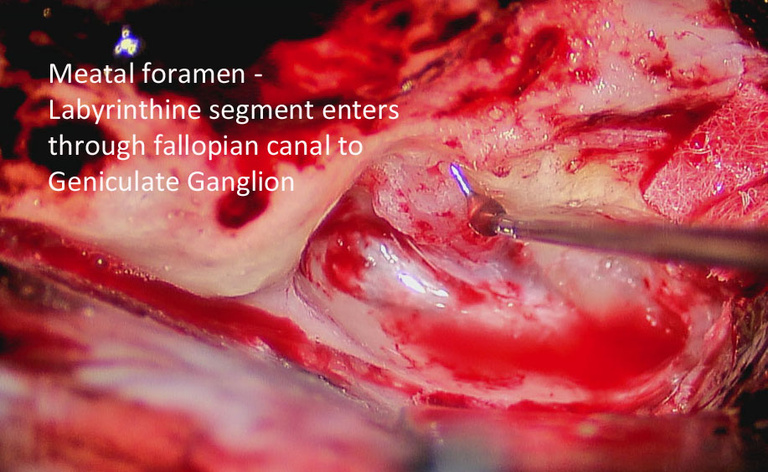
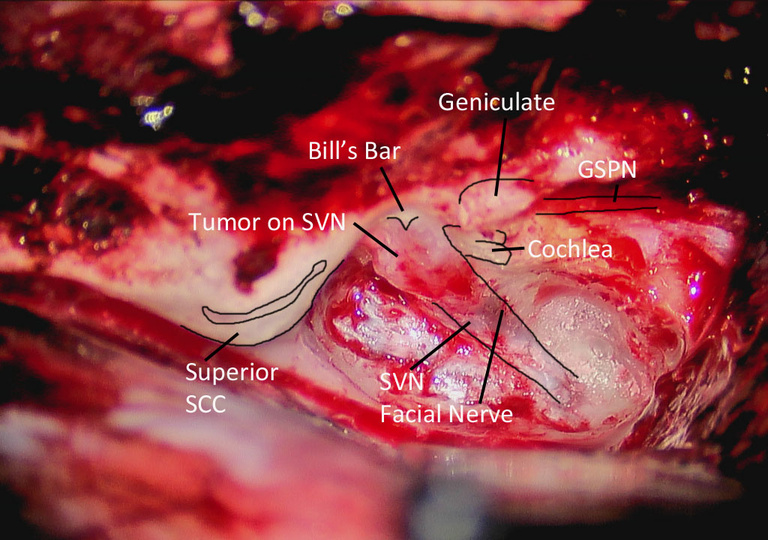
- Drill from medial to lateral - Bill's bar is lateral limit of dissection
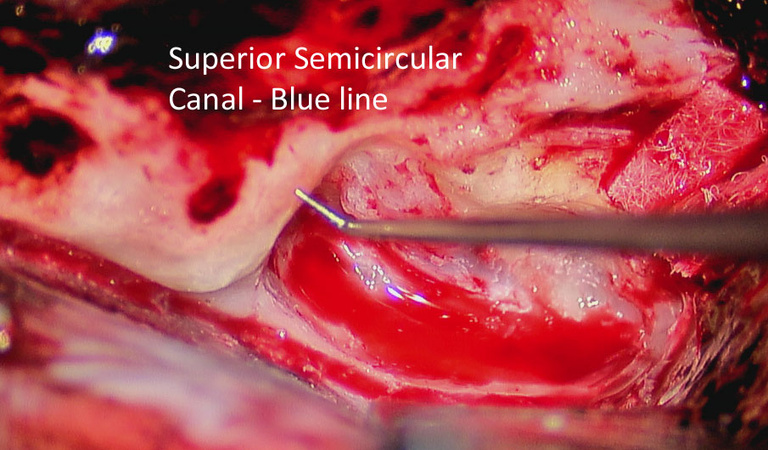
- Identify SSSC as posterior limit of dissection - blue-line the canal
- Once dura is reached, thin the bone further until paper-thin
- Flick off shards of bone using 90º hook
- Tumor Removal
- Always dissect from medial to lateral
- Proximal labyrinthine portion of facial nerve is decompressed to allow for any swelling
- Inferior = Superior vestibular site of tumor origin
- Closure
- Irrigate and ensure hemostasis intracranially
- Place Oxycel or Avitene along the brainstem vasculature
- Dural repair (Gantz will use Tisseel, Hansen does not)
- IAC defect
- Gantz - prefers temporalis fascia and temporalis plug in petrous defect, no fat graft
- Hansen - prefers abdominal fat (harvested from left inferior quadrant, bikini line (lateral Pfannenstiel)), size of first thumb phalange - can later use fat sat imaging on surveillance MRI
- no penrose, close with Vicryl, monocryl and steristrips. Pressure dressing with elastoplast and fluffs
- Bone flap
- Resorb-X plating system (Hansen). Plates superior, posterior, anterior flap
- Skin/subcutaneous tissues
- Close the subcutaneous tissues with interrupted 3-0 vicryl sutures
- Gantz - Close skin with interrupted 3-0 nylon
- Hansen - Close skin with running/locking 3-0 nylon.
- Bulky mastoid-type dressing with adequate pressure to prevent spinal fluid subgaleal effusion from developing.
Postoperative Care
Modified Operative Note
Incision and Elevation of Skin Flaps
Two possible incision designs:
- Anterior/inferiorly-based skin flap (MH)
- Incision starts anterior to tragus, extends posteriorly approximately 3-4 cm posterior to pinna, superiorly 5-6 cm, and anteriorly again to the temporal hairline
- Good for extended middle fossa approaches
- Temporalis muscle is then reflected inferiorly
- Posteriorly-based skin flap (BJG)
- Incision starts just behind temporal hairline and a rounded box shape approx 6 cm wide is carried back approximately 6-7 cm.
- Begin as low onto pinna as possible
- Temporalis muscle flap is then reflected anteriorly
- Keep temporoparietal fascia layer attached to scalp during skin flap elevation
- Harvest a large piece of temporalis fascia prior to elevation of the muscle flap
- leave cuff of fascia on either side of muscle flap
- Elevate muscle flap
- Anterior temporalis flap if posterior-based skin flap
- Inferiorly-based temporalis flap if anterior-based skin flap
- Should be able to see zygomatic root easily after elevation
Craniotomy
- Anesthesiologist may administer mannitol
- Consider hyperventilating patient
- Center craniotomy on zygomatic root
- 4.5 x 4.5 cm wide bone flap
- Use a 4 mm (BJG) or 5 mm (MRH) cutting burr to remove the majority of the bone.
- Use diamond 4 mm burr, to remove the final layer of bone over the dura.
- Branches of the middle meningeal artery will be encountered, which are controlled with bone wax or bipolar cautery
- Mark bone flap to ensure easy and properly oriented replacement at end of case.
- Elevate bone flap off of dural with Joker elevator.
- Pass bone flap off to scrub nurse
- Keep bone flap moist
- Check exposure: if the bone window is not flush with the tegmen, remove excess bone with rongeur or drill
Dural Elevation
- Circumferentially elevate the dura from the overlying cranium, using the bipolar cautery liberally to stop bleeding from the dura.
- Place Oxycel cigars under the bone flap anteriorly, posteriorly, and superiorly.
- Elevate the dura along the floor of the middle cranial fossa from posterior to anterior so as not to disrupt the greater superficial petrosal nerve (GSPN). (SEE FIGURE)
- Identify the arcuate eminence, GSPN, and petrous ridge.
- Use cottonoids anteriorly and posteriorly for dural retraction during elevation.
- Brisk bleeding from the middle meningeal artery at the foramen spinosum may be encountered and can be controlled with bone wax and Oxycel packing.
- Place the House-Urban retractor under the lip of the petrous ridge at the anticipated location of the IAC (based upon the arcuate eminence).
Identification of the IAC
- Begin drilling using a 4-0 diamond burr over the arcuate eminence to identify the location of the superior semicircular canal.
- The SSCC will be perpendicular to the petrous ridge
- The Stenvers x-ray will demonstrate the amount of bone overlying the semicircular canal (SSCC).
- Blueline the superior canal.
- The IAC is located 60° anterior to the blue lined SSCC. (SEE FIGURE)
- Lower the meatal plane over the IAC until it is well-defined
Tumor Exposure
- Drill deep troughs 270 degrees around the IAC, down to the level of the posterior fossa dura
- Develop your exposure working medial to lateral
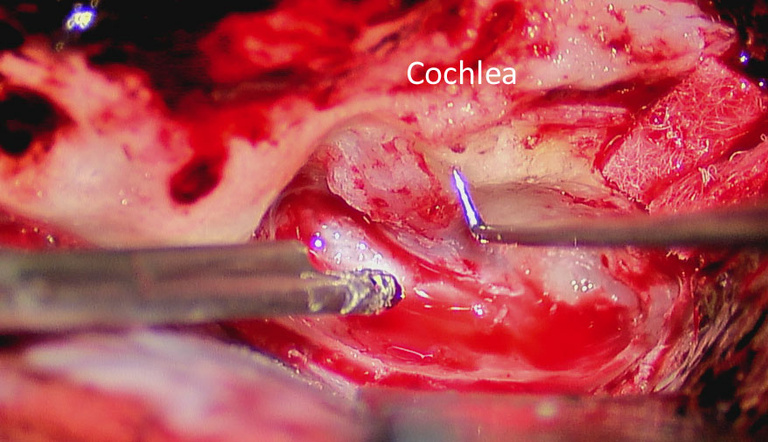
- Exercise caution when drilling laterally, due to the location of the cochlea and ampulla of the SSCC.
- Skeletonize the IAC up the level of Bill’s Bar.
- Identify the labyrinthine segment of the facial nerve at the transverse crest and decompress the meatal foramen a few millimeters.
- The cochlea is deeper than the plane of the labyrinthine segment of the facial nerve.
- May avoid drilling deep to the facial nerve anteriorly to decrease risk of violating the cochlea
- Remove the last flecks of bone from the IAC dura.
- Have audiologist start monitoring ABR
Tumor Removal
- Open the dura of the IAC over the superior vestibular nerve with a 59-10 Beaver blade or 2.5 mm hook.
- Place a direct auditory nerve electrode between the dura of the IAC and the cochlear nerve for monitoring the cochlear action potentials in real time.
- Identify the separation between the facial nerve and superior vestibular nerve at the transverse crest.
- Separate the facial nerve from the superior and inferior vestibular nerves at this location.
- Avulse lateral ends of the vestibular nerves, and reflect medially.
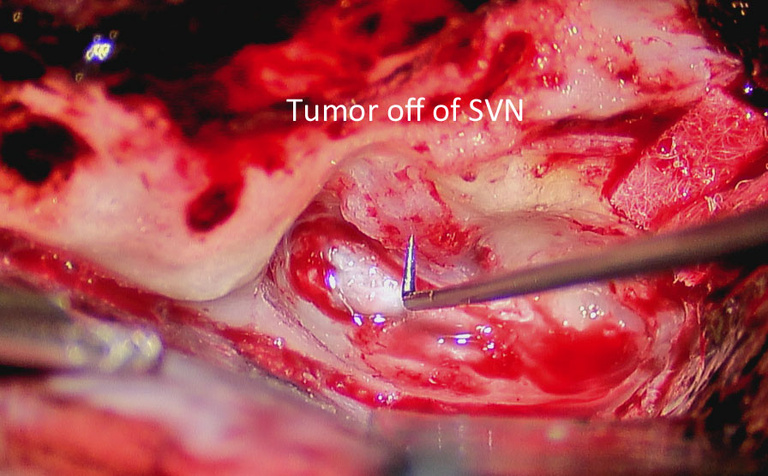
- Use a 2.5 mm hook to separate the tumor from the facial and cochlear nerves.
- Work from medial to lateral when possible.
- When tumor has been separated, cut the medial ends of the vestibular nerves along with the tumor, thus removing the tumor.
- Special considerations
- In larger tumors, it is often necessary to debulk the tumor as for TL excision, prior to establishing a plane between the facial nerve and the tumor.
- If the auditory response demonstrates prolongation of latency or a decrease in amplitude, switch strategies or pause tumor dissection for several minutes.
- A cochlear nerve that no longer responds intraoperatively may still have hearing postoperatively, the reverse may be true.
Closure
- Ensure hemostasis in IAC/CPA
- Document stimulation of facial nerve with Prass Probe on 0.05 mAmp
- Document ABR/Direct Nerve Monitoring after tumor removal
- Repairing temporal bone defect
- Apply bone wax to all opened air cells.
- Place a large temporalis muscle plug (BJG) or abdominal fat (MRH) in the IAC defect.
- Place the previously harvested fascia over the entire temporal bone defect.
- Use the anterior corner of the bone flap, or a piece of the inner table, over the defect to prevent temporal lobe herniation into the middle ear, if exposed.
- Bolster fascia into place with Oxycel ™ cigar
- Tisseal ™ is optional to further secure fascia
- Craniotomy closure
- Release the House-Urban retractor and allow the temporal lobe to re-expand.
- Relay to anesthesiologist that the EtCO2 can be allowed to rise
- Ensure an accurate neuro pattie count.
- Tack dura to pericranium with at least two 4-0 neurolon sutures to eliminate epidural potential space
- Double check epidural hemostasis
- Replace the bone flap.
- Simply replace and allow to float (BJG)
- Plate back with three plates (superior, anterior, posterior) reabsorbable system (MRH)
- Close the temporalis muscle with water-tight interrupted 3-0 vicryl sutures.
- Close the subcutaneous layer with water-tight interrupted 3-0 vicryl sutures.
- Close the skin with running-locking 3-0 nylon sutures.
- Place a large, tight mastoid dressing centered over surgical area.
- For POSTOPERATIVE CARE , see Skullbase Post-Operative Care Map
CPT Coding
- Middle cranial fossa approach
- Intradural removal of tumor
- Use of Operating Microscope
- Facial Nerve Monitoring
- ( <5 cm2) or 62141 ( > 5 cm2) cranioplasty
- Abdominal fat harvest
- *Audiologists bill and code the ABR monitoring separately*
References
Gantz BJ. Middle Cranial Fossa Technique lecture slides
Chen DA, Arriaga MA, Fukushima T. Technical refinements in retraction for middle fossa surgery. Am J Otol. 1998;19:208-211.
Gantz BJ, Harker LA, Parnes LS, McCabe BF. Middle cranial fossa Acoustic neuroma excision: results and complications. Ann Otol Rhinol Laryngol. 1986;95:454-459.
Nadol JB. Cerebellopontine angle tumors. In: Nadol JB, Schuknecht HF, eds. Surgery of the Ear and Temporal Bone. New York, NY. Raven Press, Ltd. 1993:391-413.
Weber PC, Gantz BJ. Results and complications from acoustic neuroma excision via middle cranial fossa approach. Am J Otol. 1996;17:669-675.
